Posts Tagged ‘cold weather’

A Little Egg with Your Tea

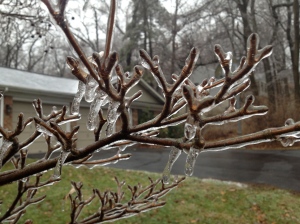
With winter finally baring its frigid fangs here in central PA, even I, a lifelong proponent of colder temperatures, have taken to wishing for warmer climes. But, with schoolwork and student teaching compelling me to weather at least one more icy winter here, I’ve resorted to finding (typically culinary) ways  to keep the brumal blues at bay! Lately, my quest for cold-dispelling recipes has led me to finally trying dishes that I’d favorited and bookmarked over the years, but had never actually attempted. First on this list of “eventual eats” was a recipe for Chinese Tea Eggs that I discovered here nearly a year ago. Captivated by the incredible look and purported flavor of these eggs, I knew I had to give ’em a go!
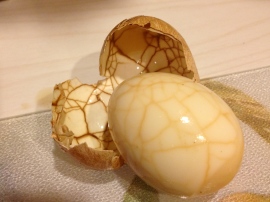
While the tea eggs are extremely easy to make, do ensure that you have enough time to allow the eggs to fully absorb the color/flavor of the tea! I made the mistake of starting my batch rather late at night, so the eggs I ended up with were a tad lighter than the traditional tea egg. However, even though the coloring was a bit pale, the flavor of the eggs was powerful and peculiarly delicious! Plus, as an added bonus, the tea and spices infused the kitchen with an incredible chai-like aroma while the eggs were steeping!

Chinese Tea EggsTea Eggs!
Cooking time: Approximately 2 hours

Ingredients

6 eggs
4 black tea bags, or 2 tablespoons of loose black tea leaves
2 teaspoons of Chinese five spice
1 tablespoon coarse salt
(Optional) Toasted sesame seeds

Instructions

1. Place eggs in a large pot and fill with enough cold water to cover the eggs. Cracked Eggs
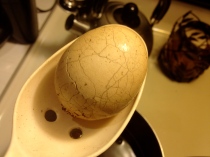
2. Bring water to a boil over medium heat and let simmer for 12 minutes.
3. Remove the eggs from the water, and with a spoon, tap the eggs until the shells are covered with cracks.
4. Return the eggs to the pot of water and gently stir in the tea, Chinese five spice, and salt.
5. Cover the pot, heat gently, and let simmer for one hour.
6. Remove the pot from the heat and leave the eggs to cool in the liquid for 30 minutes.
7. Take one egg from the liquid, and peel to determine whether your eggs are dark enough, or if they need to remain in the liquid longer.
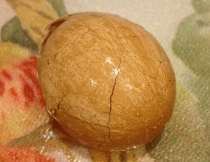
Marbled Eggs8. When you’re satisfied with the color of your eggs, remove the whole batch from the water and allow to cool fully.
9. With your eggs completely cooled, peel each egg (taking time to admire the fascinating coloration of the shells), and enjoy! You may also wish to garnish your eggs with toasted sesame seeds before serving.

Without a doubt, the process of creating a clutch of Chinese Tea Eggs wholly served to keep my mind off of the near sub-zero temperatures outside! I can only hope that they’ll do the same for you!

Until next time, happy cooking, gardening, and doing whatever else brings you joy!

Nate

Breaking Ground

If you’ve read my last two beekeeping posts, then I’m sure that you’re aware of our recent weather situation (mainly, that it’s been cold, windy, and all around miserable). The picture of the thermometer on the right was taken last week, long before it snowed! Luckily for us, though, we had a little taste of Spring weather this weekend. This meant that we had to capitalize on this fleeting opportunity to get into the garden as quickly as we could!

Although I don’t have too much time tonight (thanks to a paper on “The Yellow Wallpaper” that has yet to write itself), I thought I’d break my recent schoolwork-induced writing fast and quickly let you all know where the Scholar’s Garden stands!

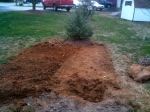
As the last frost date draws near (here in central PA it’s May 4), we’ve been scrambling to prepare the land for this year’s garden. With the warm weather and stink bugs fast approaching (the first one of those six-legged pests was spotted outside today), it was decided that this weekend we would break ground and establish the plot. Because I’ve been stuck inside working on scholarly assignments, my dad was kind enough to begin the de-grassing process in the yard. Before too long, the garden took shape, and, now, all that’s left is to fill it in with dirt, fertilize the area, and perform a soil sample or two!

With the main garden in as much order as possible, I turned my attention (and Garden Weasel) to the smaller plot which is already home to the garlic plants I mentioned in “The Equinox.” It was decided that all of the Alliums (plants in the onion/garlic family) grown this year would be placed in this spot. So, in an attempt to get a jump on the rapidly-nearing planting season, I started the rest of our leeks in the terrarium and attempted to plant our red onion sets. “Attempted” being the key word there.

As it turns out, leaving your onion sets in a plastic container tends to build up quite a bit of moisture, which, in turn, seems to turn your once-vibrant onions into the perfect hiding spot for lovely blue/green mold. Since we’re not trying to cultivate mold this year (colorful as it may be), we were forced to purchase a second bag of onions; and, eventually, place them into the ground. From what I’ve heard, you’re supposed to plant onion sets about eight weeks before the final frost date, but, as I only learned this bit of knowledge yesterday, four weeks before the final frost will have to do! Even though we encountered a few, minor setbacks in the onion-planting process, our baby alliums are, at long last, safely nestled next to their adolescent cousins.

Sadly, I must be off to ponder the inner workings of “The Yellow Wallpaper,” but I’ll leave you with a very handy, succinct guide to growing onions entitled, “How to Plant Onions!”

As always, happy gardening!

A Look Ahead

If you live in the northeastern United States, or have had the misfortune of visiting us in the past few days, I’m sure you’ve noticed how deceptively cold it’s been here. By deceptive, I mean that even though it might look bright and sunny and gardening-friendly, venturing outdoors always results in being whisked back inside by a blast of cold air and a mocking snowflake. So, in an attempt to escape from this deep freeze, I thought I’d talk about beekeeping: a new-found hobby of mine that will be picking up in the warm, sunny month of April, a month that seems about as distant as the land of milk and honey…

I was first made aware of this seemingly archaic pastime (I really didn’t think people still kept bees, quite honestly) by the great folks over at GardenFork. For reasons that I can’t explain, I decided that I would don the bee-suit and, after some convincing, I talked Eric, a good friend of mine, into joining me in this venture. By now, I’m sure someone is thinking “Why would someone deliberately place several-thousand stinging insects onto their property?”. And, I’ll admit, I thought the exact same thing the first time I heard of backyard beekeeping. But, after hearing of the incredible benefits of keeping a hive full of bees (and that bees are, for the most part, very gentle creatures), I was sold. Although there are certainly a myriad more justifications for keeping bees, here are a few benefits that helped win me over:

1. Keeping bees increases the growth and output of a vegetable garden. There’s no way around it, gardeners need bees. Without ’em, we’d have to rely solely on the randomness of the winds for the pollination of our plants (and I’m not exactly ready to put all my money on the reliability of the weather!).

2. Bees produce honey. I know, that’s a pretty obvious statement, but when you think of all of honey’s health benefits, having a local supply makes a lot of sense, especially if you’re a fan of getting your produce locally!

3. On a global scale, bees are disappearing. Literally. Because of a phenomena known as Colony Collapse Disorder, entire hives of bees have begun to vanish, leaving nothing but an empty hive and a baffled beekeeper behind. This mysterious occurrence means that new beekeepers are desperately needed to replenish the dwindling number of bees in the world. According to the USDA, bee pollination accounts for $15 billion of crop value (or, to put it another way-one out of every three mouthfuls of food you eat has been beneficially affected {directly or indirectly} by bees), so it’s in everyone’s best interest to help these little guys (or girls) get back on their feet!

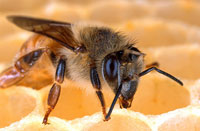
Image found at spillehoney.comOnce I was convinced that beekeeping would be good for me, if not the world, I set out to find a few resources that would help me in my quest to single-handedly repopulate the bee community (I might have been a tad over-ambitious at first). In the picture of our hive below, you might notice the book Beekeeping for Dummies, a guide that has proven to be an invaluable resource. If you’re interested in beekeeping, or if you’re a beekeeping pro, this book is bound to teach you something.

Being that I was not only convinced that I must keep bees, but now well-read on the topic, I needed supplies. And, thanks to the advertising on GardenFork’s iTunes videos, I was made aware of Brushy Mountain Bee Farm. This bee supplier had everything necessary to get started for this year (plus much, much more). What makes this company even more reputable, I think, is that they raise their own bees; and, if you live around their North Carolinian headquarters, they’ll even ship a package of them to you!

Because I don’t live in North Carolina, a fact which is a bit saddening, especially during this never-ending cold weather, I had to find a local apiary (or bee-farm) in my area. Scouring every online, beekeeping forum we could locate, Eric and I finally settled on Bjorn’s Apiary, run by Mike Thomas. If you live in PA and are interested in beekeeping, Mike is truly a wealth of information (and bees)! He breeds his strains of bees specifically for this area so that each hive will survive the winter. Not unlike an expectant mother, we’ve been rushing around getting everything ready for April 10, the arrival date of our package of Russian bees. The hive has been built, a location has been set, and all that’s left is to set up our hive and install our bees!

If all goes according to plan, Eric and I will be heading to the site of our future apiary to prepare the hive for its future inhabitants. I’ll try to take a few pictures and share them here as soon as I can! As for the pictures of my photo shoot with The Gilded Lily, the landscaping firm I had previously mentioned, I hope to have them up by the middle of next week, once I receive the negatives.

Well, that’s all the news from my frozen patch of ground, hope it’s getting warmer in your neck of the woods!
As always, happy gardening (or beekeeping)!